BARNYARD ADVENTURES!

THE ARCHITECTURE OF A LONGBOARD
05/29/2013
A long board is a beam. It spans two pints (the trucks) that are supported by the earth. Like all beams, the longboard is subject to loads- both static and dynamic. What differentiates the longboard from most beams is the nature of the dynamic load to which it is subject- these loads go from one extreme to the next in a completely unpredictable fashion. These loading conditions are influenced by a number of factors, the rider's style and the terrain being the two more obvious. -Gracefully carving down a gentle slope vs. dancing around on the board in a freestyle fashion.
-Pumping the board to gain momentum vs. free riding and power sliding your way down a hill.
-Smooth park / bowl riding vs. street riding where you constantly hit little rocks and surface imperfections...
-Pumping the board to gain momentum vs. free riding and power sliding your way down a hill.
-Smooth park / bowl riding vs. street riding where you constantly hit little rocks and surface imperfections...

OK, fine. First, lets look at the static load and its ramifications. As is true with all beams, when subject to load, especially a point load, the beam wants to deflect or bend. This reaction can be mitigated in a couple of ways, each fundamentally different from the other.
Camber: In architecture, beams are often given camber (or upward bend). This pre-deformation of the beam serves to allow the beam to flex down to flat. In other words, using mathematical calculations the engineer determines how much load the beam will experience, then how much it will bend as a result. Once that is determined, the beam is designed with enough of an upward bend so that when the load is applied, it deflects down to flat, effectively compensating for how much the beam is expected to bend.
So, how do we use this in the construction of a longboard deck? We give a deck camber when we don’t want to reduce the amount of flex a board will have, but want to make sure it doesn’t flex so much that its belly scrapes against the ground or, worse, fails altogether by breaking.
Why do riders like flex? Not all of them do. At the end of the day it is a matter of both ergonomics and physics. First off, a cambered board will absorb bumps more effectively than a stiff board. This is easier on the feet, ankles and back. A cambered board will also help absorb the energy that is released when coming out of a turn. To some riders, this makes carving more “physical” (I put physical in quotes because, as near as I can tell, this is purely anecdotal and not necessarily rooted in science). One thing to note: a cambered board, by its nature, means that the deck’s relationship to the trucks, in terms of its angle, is constantly changing. As the rider pumps up and down the trucks spread in and out. This actually makes your turns and slides less efficient. Also, a cambered board means your center of gravity is higher in relationship to the ground. This means the stability of the rider is compromised.
No I am NOT, baby goat. Building longboards is serious business!
Anyway, ...Concavity: This is when we pre stress the wood deck concave across its width. What this does is to make the board stiffer by effectively creating a deeper beam in section, all without adding additional weight. In architecture, the amount of load a beam can withstand or carry without deformation or failure is directly proportional to its depth- the deeper the beam, the greater the load it can carry. In skateboarding, it is not advantageous to have a really thick (or “deep”) board. This added material just adds weight, and we don’t typically want this. So, to create a deeper beam we simply upturn its sides.
Notice that with concavity we end up with a stiffer board, while with camber we retain a board’s flex. This is an important distinction. If you want a lot of flex, you camber the board. If you like a stiffer board, you give it concavity. These are two materially different characteristics. What we are talking about here is the property of the material, and how we can alter it to our benefit. For the record, there are a number of boards on the market that have both camber and concavity. Why you would do this escapes me as these two types deformations and the characteristics they impart are fundamentally at odds with one another. For the record, giving a board concavity does not eliminate flexibility, it only reduces it.
The other things concavity does have to do with ergonomics. First off, down hill riders often like a little concavity in their deck because it enables them to find the center of the board through feel. When bombing down a hill at 50mph, you don’t want to look down at you feet to locate board center. Concavity also makes carving and tight radius turning easier and more efficient. Like a kick tail, the upturned edges give the rider additional leverage when pushing down on the deck with their feet to carve and turn.
I like a relatively flexible board, but one that has a very surfy, creamy ride that is easy on the ol’ back and ankles, so I will build concavity into it. To achieve concavity, we must press the board into shape during the lamination process.

STOP YOUR WHINING! SHEESH. As I was saying...
The Material:
For one of my earlier boards I went to my local lumber store and bought what was labeled as ¼” Birch veneer plywood. The material cost me about $20.00, and I was ecstatic because my yield from this material would be 4 boards (I bought a 4’ x 8’ sheet that I then cut down into 8- 12” x 48” planks). For the record, I could increase the number of boards I get from one sheet by making my boards thinner across the breast (mine end up at 9 ½” wide). But cutting my initial planks at 12” gives me tolerance (room for error) on either side of the board, plus it helps out in the bending process (the wider the initial plank from which the board will be cut, the farther apart I can spread the risers on the form, allowing for an easier bend. Like any beam, the shorter the span, the stiffer the beam and harder it is to bend).
Anyway, I got this material to the shop, cut it, applied glue to the two halves, put them together and then into the press and clamped it into the concave I wanted. I expected to lose about 25% of the bend when plank is released from the press, so I bent my board so that there is a 1” difference between the center and the outer edges. 24 hours later I removed the blank from the press, cut out and finished the board, gripped it up and put on the wheels and trucks. This prototype was to be my son’s 11th birthday gift, and it looked amazing. But, because it was a gift, I wanted to give it to him in pristine condition, which meant he had to be the first person to stand on it. Well, on his birthday, I gave it to him and he went bananas. Then he stood on it, and the board deflected to within ½” of the ground. I was crest fallen. This was an un-ridable deck. Funny enough, in addition to a longboard, my son had also wanted a trampoline for his birthday. Given this experiment, he basically got both.

Enough outa you, Chimp! That's what I get tryin' to learn something to a menagerie.
So what went wrong? Every longboard I have ever seen is between ½” and 5/8” thick, so why was mine deflecting so much? First, I decided to throw some calipers on the board to determine its actual thickness. Turns out it ended up @ 3/8” which means the plywood that I bought was actually 3/16”, not the ¼” as marked. 3/8” is too thin for a long board. Still, given the amount of flex the board had, I couldn’t imagine that adding an additional layer of the ply would reduce the deflection enough to make it stiff enough to ride.
I began to wonder if the material I bought was birch all the way through, meaning each ply (or veneer) was birch, or if it was just birch on the faces and some other material like pine for the interior veneers. At the end of the day, I never got a definitive answer, but I suspect that what I bought was only birch on the faces.
The Solution:
Only buy good quality Baltic Birch plywood. This material is much stronger and more consistent in ply thickness and material continuity throughout the veneers. Material continuity is important. If there are voids or cracks in any of the veneers, this weakens them and renders the board weak as a result. The only downside to this is that the material is harder to come by, and is only available in 5’-0” x 5’-0” sheets.

Could I please get through this w/out all the interruptions?
The Glue:
I have read that by laminating four sheets of 1/8” ply rather than 2 sheets of ¼” ply renders a much stiffer deck. I am not sure why this is, but I can tell you that to execute this is a bit more difficult, and it is because of the glue process. The glue I am using is Titebond III, which has an effective open working time of 10 minutes. If I have to spread this over 6 surfaces (2 sides of 1/8” ply that constitute the core, and one side each of the top and bottom ply) by the time I am on the third side, the glue on the fist ply is starting to air dry. You can minimize this to a degree by spreading the glue thickly, but this seems wasteful and is messy.
There is nothing more stressful than a glue-up. Once the glue sets, there is no going back, so any mistakes in the process are irreversible. The glue should be spread evenly over the entire surface, and there should be no debris (bits of saw dust, hair, etc…) in the glue as you need surface-to-surface contact. The way the glue works is it gets absorbed into the pores of the wood, creating a bond (matrix) that links top and bottom surface by bonding and solidifying not just on the surface, but within the pours of the wood below the surface. This “link” must be continuous from one surface to the next to be successful.

Et tu, Brute?
Back to the working time: one of the ways to extend it is to pre-wet the surfaces of the wood. The reason the glue dries so quickly is that the wood is dry and thirsty, and as such begins to suck the moisture out of the glue immediately. This process is exacerbated when the glue is spread thinly. By pre-wetting the wood surface, the pores of the wood are not as dry and, therefore, don’t draw the moisture out of the glue as quickly. I have found that this process increases my working time by a good five to ten minutes (more if I am going heavy on the glue).
Another thing you can do to increase the open working time of this glue is to dilute the glue itself. I don’t recommend this. It is simply too hard to get the right mix, and I have read inconsistent numbers as to what the exact mix should be. If you end up with a mix that is too thin, you compromise the bond strength of the glue.
For the classes I teach in my studio, I have used Elmer’s Glue All brand. It is the white glue we all grew up using, and it bonds every bit as strong as Tit Bond II or III, especially in veneer work. This glue has a much longer open working time, and if you pre-wet the surface of the wood, you can extend this even further, making for a nice and relaxed glue-up.
Also, I have a series of 6” and 9” paint rollers that I use to apply / spread the glue. This speeds up the process enormously, and actually eliminates the need to pre-wet the wood surface. Best not to use foam rollers as they absorb a ton of glue, requiring you to use more in the application process. Also, if your doin' a lot of boards over the course of a few days, you can just wrap the glue saturated rollers together in a plastic bag and tie the top. They will keep till the next day, and you will have glue impregnated rollers ready to go. If you add a little water to the bag, the rollers will keep even longer.
Well, alrighty then, Llama! Thanks for askin'. Finally someone showing a little respect.
The press used consists of a system of beams- two side or edge beams that support the edges of the glued sheets, and a center beam that goes on top of the sheets. There is an additional beam (the cross beam) that prevents the top beam from bowing as the end bolts are cranked down. I have other press designs, but for the classes I teach, I wanted one that would further demonstrate how a beam works and be simple enough for a kid to build in his/her own garage. So, this design does the job. Nothin' fancy! That's my motto.
The press used consists of a system of beams- two side or edge beams that support the edges of the glued sheets, and a center beam that goes on top of the sheets. There is an additional beam (the cross beam) that prevents the top beam from bowing as the end bolts are cranked down. I have other press designs, but for the classes I teach, I wanted one that would further demonstrate how a beam works and be simple enough for a kid to build in his/her own garage. So, this design does the job. Nothin' fancy! That's my motto.
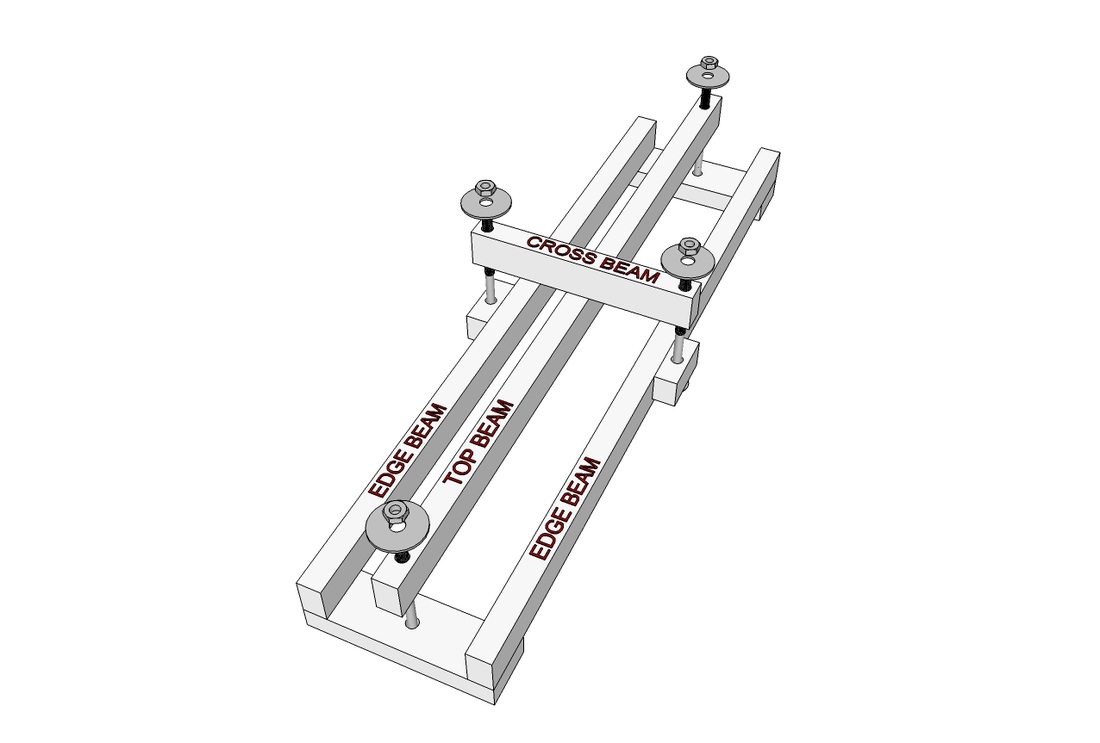
THE SIMPLE PRESS
The way it works is simple: you apply glue to the veneers or sheets of 1/8" thick wood, carefully spreading to cover every square inch of the sheet. The top and bottom sheets only need glue applied to one side, but all the middle sheets need glue applied to both sides. I have the kids work in teams of two, thus speeding up the process. As a sheet is covered, it's place on the press, and the next sheet is addressed. Once all the sheets are glued and in the press, I have spring clamps that the kids use to hold the sheet in place, preventing them from sliding around as we crank the top beam down. This top beam presses the wood down and together, creating the concavity we are after.
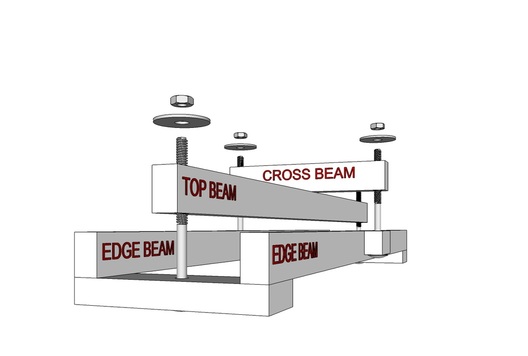
Once we have cranked the top beam down to the point we want, I have the kids site the top beam. They notice that now it has a slight arc or camber over its length. This is because the wood resists the beams downward pressure enough to cause the beam to bow where there is no direct downward loading (as there is at the ends at the bolts). To eliminate this camber, we add the cross beam and crank it down till the main top beam is straight.
Now, as I mentioned above, some longboard companies create boards that have both camber and concavity. If the kids want this condition, I have them leave off the cross beam, and crank the ends down still further. But, for me personally, I prefer no camber.
When the beams are cranked to the point of desired concavity, we allow the glue to dry overnight. The next morning, we release the pressure from the beams, dismantle the press, and the board remains concave without any spring-back! It holds its shape, and we are ready to cut the board from the wood.
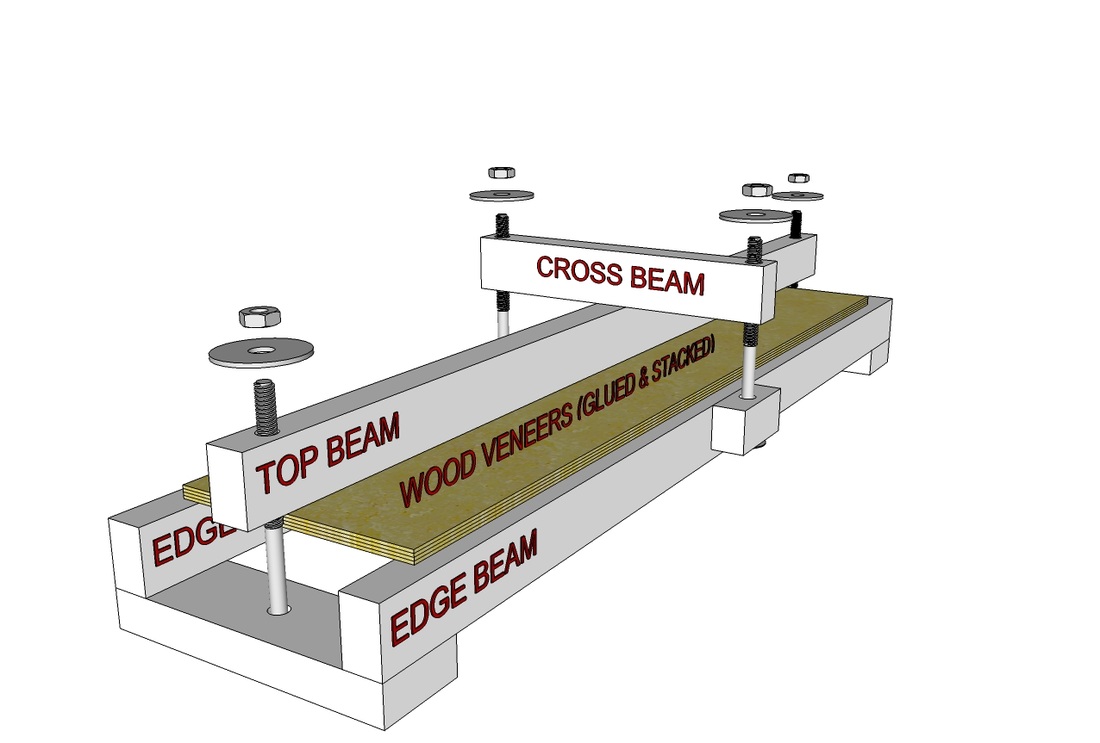
THE PRESS BEFORE THE BOLTS ARE CRANKED
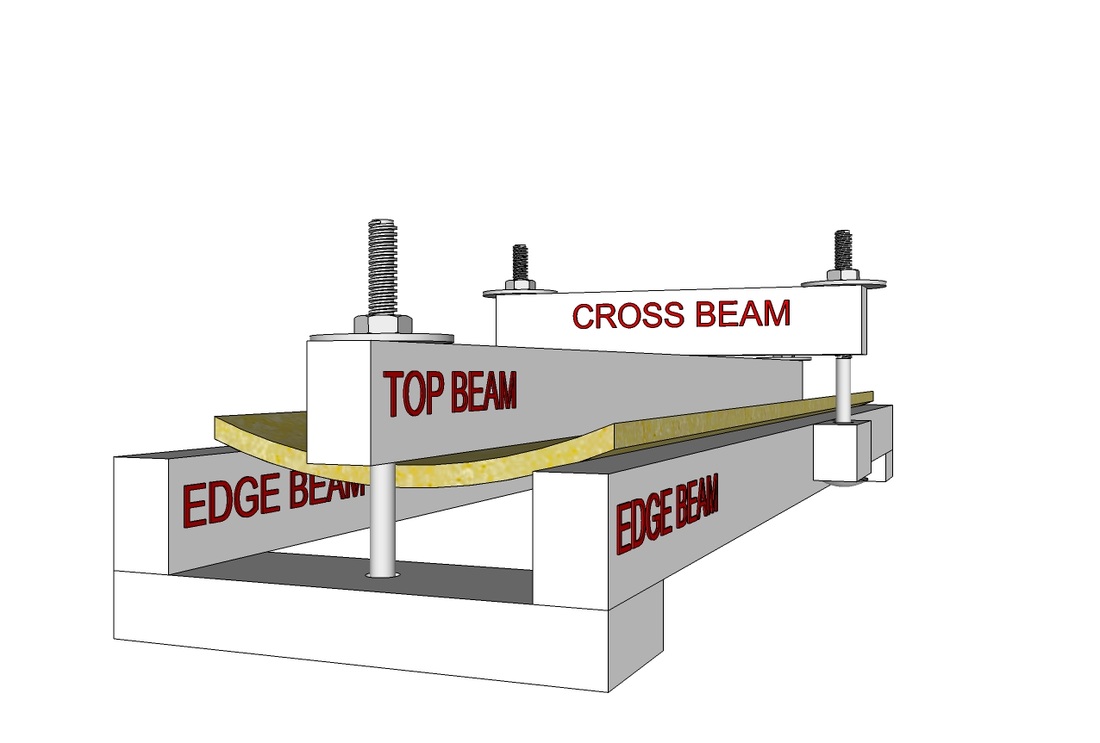
THE PRESS AND VENEERS ONCE THE BOLTS ARE CRANKED TO THE POINT OF DESIRED CONCAVITY

The Penguins know how to chill!

Well excuse me, Mr. opposable thumbs, for tryin' to liven things up a bit.
So, back to makin' the boards. I need to back up a bit to right before we put the boards in the press. Each deck requires four 1/8" sheets of Baltic Birch plywood. Baltic Birch comes in sheets that are 5'-0" x 5'-0" (an unusual size for plywood, and a bit of a pain to deal with when trying to fit it into the back of a standard pick-up). But I digress...
Each 5'x5' sheet will produce seven 10" x 48" sheets- 6 with the grain running the long way (or lengthwise), and one with the gran running the short way (or across the width of the sheet). I like this because it helps me to illustrate to the students the ways that wood grain affect structural integrity. I will put two sheets side-by-side across a couple of saw horses so that they are supported only on their ends. I then return to concept of a beam, and ask the students to tell me the difference in how each sheet (or beam) reacts to the span. the students notice immediately that the sheet with the grain running across the 10" width sags under its own weight while the sheet with the grain running its length is much stiffer and able to make the span without any "deflection" or sag (I am an architect, so I try and introduce fancy pants architectural terms whenever possible). The kids will push on the center of the sheets and feel the difference in each board's strength. This really drives home for them the relationship between grain and strength and flexibility.
So, when we make our decks, we will use three sheets with the grain running lengthwise, giving the board great tensile strength (another fancy word for them to chew on), and one sheet (usually the second down from the top) with the grain running the width (this imparts a little added strength and additional flexibility).

Glad to hear it, Goat!
So, let's look at the sheet that has the grain running its width. What can we do to make it stiffer (I ask my charges)? This is a tricky question, but it brings us back to concavity. I illustrate this by grabbing a piece of paper. A piece of paper has no "inherent" or "innate" stiffness (More vocabulary for you to chew on, Goat!). Can we change this without adding anything to the paper? In other words, can we change the material nature of the paper and if so, how?
We can fold it or roll it so its sides curve up.
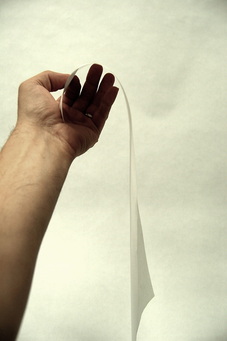
PAPER HAS NO INHERENT RIGIDITY AND, CONSEQUENTLY, SAGS UNDER ITS OWN WEIGHT.

HOWEVER, BY UPTURNING ITS EDGES WE IMPART RIGIDITY TO THE PAPER. WE HAVE CHANGED THE INHERENT MATERIAL PROPERTIES OF THE PAPER SIMPLY BY CHANGING ITS FORM.
Once the material science exercise is over, I have the kids pick out the sheet they want as their top sheet. Then, we center their deck pattern on it and trace it onto the sheet. I also have them locate the center of their deck at both ends and draw a line connecting them. This facilitates proper truck placement later. Once this is don, it's glue-up time.

Who invited the Cyclops to participate in this chronicle! Was it the chimp?! Very funny! He's always throwin' a monkey wrench into my days.